How to Start a Blog in 2023 – Easy Guide with Screenshots14 min read
My name is Jakes Jacob and I have 16+ years of experience in blogging. I will help you on how to start a blog in the right and easy way.
Blogging have evolved a lot. Everybody can scribble out something in the websites. As a human, we would love many to read our articles. To get people to our blogs, we need to do something called as Search Engine Optimization(SEO). Back in the days, you could have written a blog post consisting of 100 words and fill it with the focus keyword. This would have fooled Google and other search engines.
Things have changed. Google have become far intelligent now. So writing a blog is not easy now. Also, many people believe Blogging is dead with the advent of social media, YouTube and hasty lifestyle of people. But, the reality is that the actual competition is lesser now. People want easy money. Most of them don’t have the patience. On this particular day, 1000 people might start a blog. But the stats tells us that only 50 out of every 1000 continue to blog for two months and long. Hence, if you put consistent effort on just writing blog posts, you can make $1000+ per month easily.
Busting the myths
Blogging involves Coding
When you look from the perspective of an outsider, it might seems that you need to be technically proficient, like expert in coding and good in graphics designing. No, you needn’t be in knowledgeable in either of these. Open Source Movement have made our life simple. We will be relying on a blogging platform called WordPress and that way we needn’t get our hands dirty by coding or anything. By the end of this article, you will realize that even a ten year old can start a blog(Of course, only if you give access to your credit card info :)).
Blogging is Expensive
Blogging can be expensive. It depends on how you do it. If one want to spend money, one can hire a graphic designer to design the logo, a web developer to design and code the blog and buy many plugins. My personal recommendation would be to start blog with a small budget. After six months, if the fire is still on and passion to blogging have thrived, then slowly you can consider to scale the blog. If you have the will and is ready to put the effort, even scaling the blog can be done with tiny budgets.
In most of the tutorials, you would have seen you need only $2 per month to start a blog. Most of us bloggers and YouTubers are affiliates of the hosting providers. So to lure you, bloggers would have put the title like ‘Start a blog for $3 per month and make money online’. But, the reality is that there are no monthly plans. So you will have to opt for annual plans. Also, often when you opt for three years or more only, you will get the hosting at the rate of $3 per month. Else, it will be $5 to $7 per month.
Let me be transparent here. You can start a blog with a basic plan if you spent $30 to $40 for an year. My recommended plan would cost you $130 for four years. This includes a free domain for the first year, unlimited bandwidth and lifetime free SSL certificate. Also, with this plan you are not restricted to one blog. If required, you can create more blogs using the same space.
If you just want to understand blogging and WordPress before you invest in, I would recommend you to head to the post tiled ‘How to Start a Blog with Zero Dollar?’. With this, you can study about blogging basics and WordPress features. Once you are serious about blogging, you can later revisit this post and start the blog professionally.
Jargon you should be aware before we start
- Domain Name – Domain name is the website address. For this very website, the domain name is hustlemash.com. Every website needs a domain name.
- Hosting Space – Once we have the domain name, we need some space to host our website. Basically, we need to put our website files in some space in Internet. For this, we need to depend on hosting providers. These providers will give us some space on their servers where we can install applications and place our files.
- Blogging Platform – It is the application that enables you to blog. It store your website data in database, take care of the back-end coding and all. It provides you an interface from where you can write blog posts and design the blog. Many blog platforms are available. WordPress, Blogger, Joomla and Drupal are few of them. In this tutorial, we will be relying on WordPress as our blogging platform.
Without further ado, let me take you to the easy and detailed guide on how to start a blog. If you face any difficulty at any step, feel free to comment on this post and I will try to answer to your queries. You can also connect me at my personal Instagram(@jakesofalltrades) and message me your questions.
How to Start a Blog?
Below are the steps you need to follow to start a blog.
You can click on the below buttons if you want to skip the flow and go to any particular section directly.
1. Pick the niche
The first step is to decide what you will be writing on your blog. Of course, it’s your blog and you can write whatever you wishes on it. However, it’s a good practice to restrict your blog to a particular topic(niche).
Ask yourself the below questions.
- What is your blog going to be about?
- What are the subjects/topics/hobbies you are interested in?
- What are the subjects/topics/hobbies you are having knowledge?
- What are the subjects/topics/hobbies that people are interested in?
The below infographic will help you to find your niche.
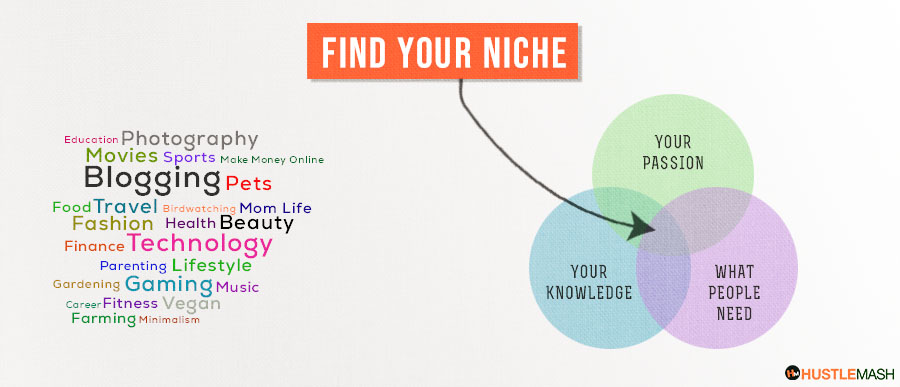
The ideal niche is something where your passion lies, something where you have knowledge and something which have audience to read your future blog posts. You can also pick a niche which you want to learn and write along while you learn it. So, it’s not necessary you are having the knowledge from start of the blog. Instead, as you proceed, you can learn and write about it in parallel.
One thing you need to keep in mind is that blogging is part of creating a brand. For a brand, to market and make money online, you would need a loyal audience. This is possible when you stick with a particular niche. It makes you an accountable author and expert in that domain.
2. Pick the domain name
Now that you have selected the nice, choosing domain name should be easy. I hope now you understand what is the meaning of domain name. Domain name have two parts, viz. website name and website extension. For example, if you consider google.com, Google is the website name and com is the extension. Hence, there are two sub-steps, viz. pick a name and pick a web extension.
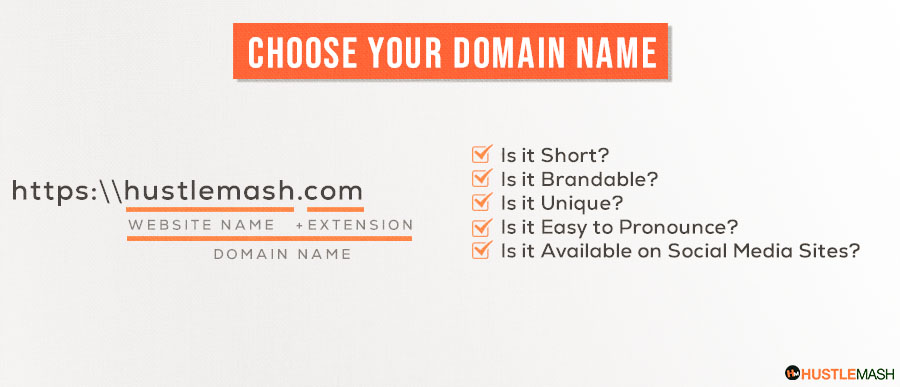
- Pick A Name – Try to choose a name that appears nice to you. When you choose the name, try to keep the below rules in mind. No need of pressure here. These are not must follow rules.
- Choose a short name – People won’t like to type too many characters before visiting your site. So try to keep it short.
- Choose a name that is brandable – Keep in mind, in future this name is going to be your brand.
- Choose a name that is unique – Try searching the name in your mind in Google. We don’t want much results to come in google for that name. This makes our job easier to establish our name in Google.
- Is it Easy to Pronounce? – It’s good if the name is easily pronounceable.
- Is the Name available in social media? – Search in social media websites like Instagram, Facebook, and twitter whether the name is available in these media. I recommend using https://www.namecheck.com/ to check if your name is available.
- Pick An Extension – In most cases, we would be targeting for a global audience. So if you want the global appeal, the best choice for extension is ‘com’. If ‘.com’ is not available, you can consider ‘.net‘, ‘.org‘ or ‘.co‘. If you are targeting only a specific area, consider the extension corresponding to your country. For example, there is ‘.au‘ for Australia, ‘.uk‘ for United Kingdom, ‘.de‘ for Germany, ‘.in‘ for India, etc.
Examples of good domain names
- YourName.com
- YourNiche.com
- YouNicheBlog.com
- YourBrand.com
Consider your real name or nick name as your domain. The best thing is to convert your name as a brand. In future, this will help you to build yourself as a brand. It will be helpful to register yourself as an influencer. This gives immense options like selling courses, selling digital products, selling merchandize and many other things.
3. Pick the hosting service
You need space in the server to host your website files. For web hosting, we have many players. We need to consider many things while choosing the best web hosting vendor. But, let’s make it simple. You need to consider only three factors – price, performance and user friendliness.
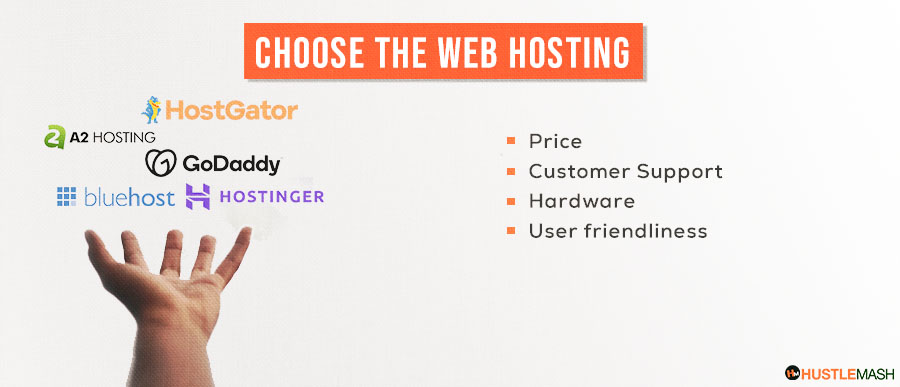
We need a cheap hosting solution which gives good performance. Many cheap players have unavoidable downtime. We don’t want our site to be down at times. We need to avoid it. Next thing is that the control panel(User Interface) provided by them should very easy friendly. Considering all these, we filter out the bad players and we list the good and best web hosting providers.
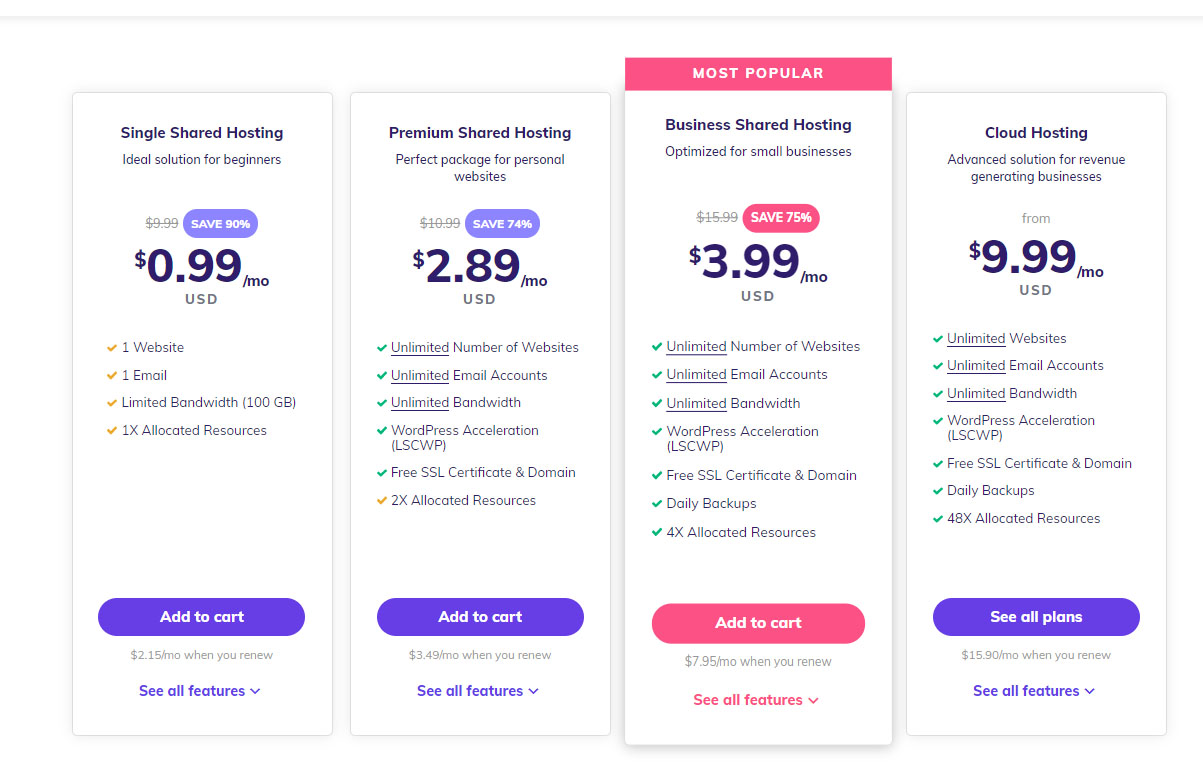
I personally recommend Hostinger from this list. Make sure you buy both the domain and hosting space from the same provider. It will avoid the complex steps where we need to point the domain name to the hosting space. For the remaining steps in the tutorial, we will be using Hostinger. However, for any other provider, the steps are going to be relatively same. So feel free to stick here and read on.
Why you need to choose Hostinger’s Premium Shared Hosting Plan?
- For 4 years, you need to spend only $144.
- It includes a free domain name.
- It includes free lifetime SSL certificate. For those who don’t know what is SSL, your website name starts with https instead of http. Without sounding too much technical, let’s understand that this add an extra layer of protection for your website.
- It gives you 100 free email accounts. This means, you can setup an email like [email protected].
- You can spent $7 to $10 per new domain and can host your new blogs in the same hosting space without any extra cost.
- You get Unlimited Bandwidth. This means even if your blog gets 1 lakh hits per month, it is highly unlikely that your website will be down.
4. Make your blog online
If you have followed the above steps, by now you would have finished selecting a good domain name and the niche you intend to write the blog posts. No pressure is required here. If you need more time, feel free to think for few days. Bookmark this page and come back later once you have made up your mind. Let’s go ahead and buy the domain name, the hosting space and install WordPress.
Pay attention and follow the below steps carefully. In the next 10 minutes, your WordPress blog will be ready.
- Head over to https://www.hostinger.com/. Scroll down and see the plans available.
- Choose the Premium Shared Hosting plan and add to cart. My recommendation is to buy this plan for 48 months(4 years). But feel free to choose the plan and period based on your sense and your requirements.

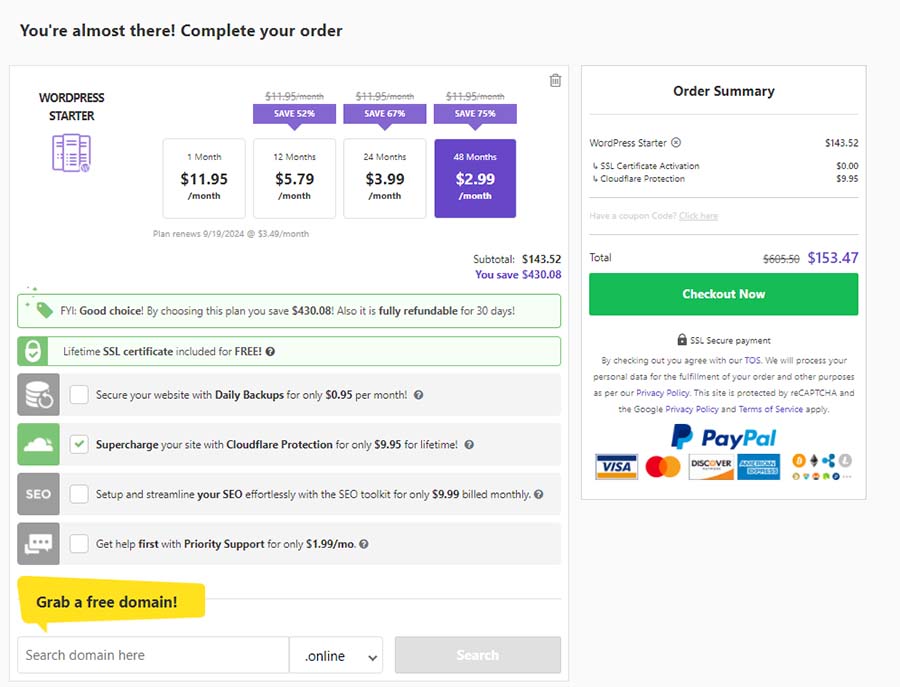
Once you have selected the plan and have clicked on ‘Add to cart’ button, you will reach the below shown page. It is recommended that you check the ‘Cloudflare Protection’ option. This will give a decent protection against hackers and avoid site crash for lifetime.
- Search and Add Domain– From the cart page, search for your name and add the domain name to your purchase. For example, let’s say you input ‘thejohndoeblog‘ in the domain search textbox and select .com from the dropdown. Once you have added the domain name, the page will get refreshed. With this plan, as aforementioned, for the first first year, the domain name is free. If required, you can extend the domain registration period to 2 or 3 years based on your need.
Also, select ‘Hide personal information’ option. You might be wondering why you need this. If you are not selecting this, anybody can search for your website name in sites like who.is and they can retrieve your email address and mobile number. So, it is advised to add the hide personal information option to our cart.
Now, you can click on the ‘Checkout Now’ button. On the next page, you will be prompted to create an user account in Hostinger. This step is straightforward. You just need to provide your email address and setup a password. Post this, you can pay the amount from any one of the multiple payment options available. - After payment is successful, you can login to your account at Hostinger. Once you have selected the domain name, select WordPress from the panel. Once selected, you can setup the WordPress account by providing simple information like name of website, type of website, etc. You will be also asked the location to install WordPress. Finish the setup and you are ready to proceed.

5. Customize Your Blog After Installing WordPress
Now, you will have an option to Manage WordPress. This is how you can login to your admin dashboard of your blog. Here, you can change the design(WordPress theme), install features(plugins) and various other things.
- Change the theme – From the left side panel, go to Appearance and select Themes. You can search for themes here. Select the one you like and install it.
- Design and Change the logo of your blog – You can further customize the design. Go to Appearance >> Customize. Here, you can find option to change your logo. If you know Adobe PhotoShop or Illustrator, you can design a logo and upload it here. If you don’t know designing, head over to https://logomakr.com/ and make a free logo with zero designing skills.
- Install Plugins to improve layout and performance – I recommend to install the below list of free plugins and enhance your blog. I am not going to explain in detail what are these plugins for. Try researching and install it by yourself. If you still need help, feel free comment on this post and I can help you to proceed.
- Pretty Links
- Custom CSS and JavaScript
- Yoast SEO
- wpDiscuz
- WP Fastest Cache
- Worth The Read
- Smush
- Classic Editor
6. Start Writing Blog Posts
Now you are all set and you can start writing blog posts. From the life sidebar of your admin dashboard, on the top you can see the menu called ‘Posts’. You can click on ‘Add New’ option and start writing. Once you have finished writing, you can hit the publish button to make your post live.
Follow my 30 Day Blogging to Success Routine to get the initial head start. It provides you a printable blueprint to track your growth.
Conclusion
You are now an owner of a blog. Take a pat my friend. I whole heartedly welcome you to the world of online hustling. I would recommend to keep aside about the make money online factor for the first couple of months. Instead, put efforts into writing and enrich our blog with a handful amount of good articles. Once this is done, search engines will gradually know your blog’s presence in Internet.
If you want to know about monetization possibilities of your blog, you can go ahead and read article on my blog titled ‘Best Online Side Hustles‘.
All the best folks. Fee free to connect me at Instagram(@jakesofalltrades) in case of any questions or assistance required.